Maple syrup bubbling and boiling in the sugar shack is a sure sign that spring has arrived.
Have you ever considered making your own maple syrup? All you need is a few sugar maples and this handy step-by-step guide to walk you through the process: building your own fireplace, tapping the trees, storing the sap and boiling it down. Sweet success awaits!
When a German uncle of mine visited in the mid-70s, he was quick to procure two pieces of Canadian exotica: a pair of mukluks and a large bottle of pure maple syrup. While he cherished the mukluks, he revered the maple syrup. And on Saturday nights, he would park himself in front of the TV with a stack of pancakes dripping with maple syrup and melted butter, to pursue his burgeoning passion for yet another Canadian institution, Hockey Night in Canada. For particularly important games, he would even don his mukluks. With a nod of gratitude for his memory and to Native Canadians for sharing their craft with early settlers, here’s a step-by-step approach to the amber alchemy of backyard sugaring.
STEP 1. CHOOSING YOUR TREES
The first step in backyard sugaring is ensuring you have suitable trees. While you can use several species of maple to make maple syrup, the sugar maple (Acer saccharum), yields the best sap and is the one most commonly tapped. Tree size is another important consideration. A sugar maple should be at least 10” in diameter to be tapped. Tapping smaller trees could harm them. Generally speaking, the greater the diameter of a tree and the spread of its branches, the greater the sap production. Finally, choose trees that are healthy, easily accessible and have a southern exposure.
STEP 2. GATHERING MATERIALS
In addition to suitable trees, you’ll need the following
materials for backyard sugaring:
- a drill with a 7/16” drill bit
- a rubber hammer or mallet
- spouts or spiles about 3” long (available at the
local Co-op) - sap buckets
- a large sap container (e.g. a large clean garbage can)
- several concrete blocks
- materials to build a chimney (small bricks or a
length of stove pipe) - firewood
- a thick metal roasting pan
- thick tinfoil
- long handled spoon
- a sieve
- candy thermometer
- coffee filters
- cheesecloth
- mason jars
Although the list may look a little daunting, you likely have most of the materials already and can improvise most of what you don’t. For example, instead of buying metal sap buckets, try attaching wire handles to metal coffee cans.
The number of spiles and buckets you need depends on how much maple syrup you’re after. Roughly speaking, for each litre of syrup, you’ll need to drill one hole. So to make 10 litres of syrup, you’ll need 10 spiles and 10 buckets.
Selecting a suitable pan is particularly important. Try to get one of restaurant-quality, around six-toeight inches deep with a lot of bottom surface, say 18”x 24”.
STEP 3. SETTING UP
Now that you’ve chosen suitable trees and gathered your materials, it’s time to set up your boiling unit, or evaporator so you’ll be ready to go when the sap gets running.
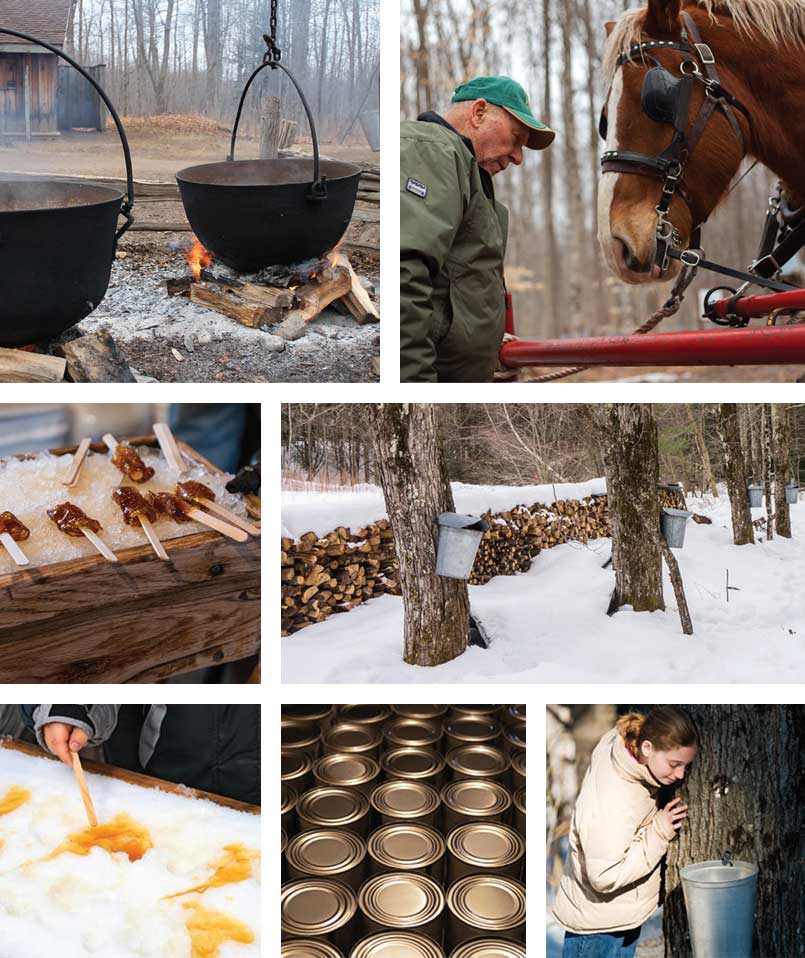
First, a note on location. The physics of do-ityourself sugaring dictate that you set up outside. Simply put, maple syrup equals sap minus water. Lots of water. Since sap from sugar maples is about 97 percent water, making maple syrup means a whole lot of boiling. In fact, you need to boil off 40 parts of water to end up with one part of maple syrup. This means producing one litre of syrup on your kitchen stove would pump 40 litres of water into the air in the form of steam, quickly turning your kitchen into a sticky, wallpaper-wilting sauna.
While there are countless ways to build an outdoor evaporator, all share the same governing principle: reducing sap to syrup as quickly as possible. Here’s a simple, effective method. Feel free to improvise in the weeks and years ahead.
Begin by selecting a flat area on which to build a small cement block “firebox”. Be sure to choose an area where it is safe to burn a small fire for long periods. Next form the sides of your firebox by positioning your cement blocks lengthwise in two parallel lines. One course of cement blocks per side should suffice. Two levels of blocks works well.
The distance between the sides depends on the dimensions of your roasting pan. The idea is to be able to rest the pan on the blocks very close to the flames while maximizing the amount of heating surface exposed to the flames.
Once you’ve formed the sides of the firebox, fashion a chimney at one end to create a draught and draw the smoke away. You could use a length of stovepipe or stack some of the loose bricks. (This may take some ingenuity but it is worth the effort. To control the draught, improvise a damper at the top of the chimney and place a cement block at the front of the firebox. Keep in mind you’ll need to move the front block frequently to add wood.
Finally, since flames tend to be drawn towards a draught, mound some sand or dirt at the chimney so the flames will be forced up and into contact with the pan.
TIP: You’ll need plenty of firewood to keep the evaporator going, so be sure to stack it nearby. You’ll also want to place your sap container near the evaporator for easy access.
STEP 4. TAPPING YOUR TREES
Generally speaking, tapping begins in late winter or early spring and carries on into April. It’s important to take your weather clues from Mother Nature, not the calendar. The best time to tap is when nighttime temperatures still dip below zero and day-time temperatures have begun climbing to 5°C to 10°C. Sudden cold snaps will stop the flow of sap, but it will start up again as soon as warmer temperatures return. Since it can be tricky to figure out the best time, try tapping a single tree and monitoring its progress. When the sap starts running well in this tree, it’s time to promptly tap the other trees that you’ve singled out.
Drill a hole 1 1/2” to 2” deep into the tree trunk beyond the bark, at a slightly upward angle, two to five feet above the ground on the south or west side of the tree. Drilling on the south or west side helps maximize your sap yield since the sun begins warming this part of the tree early in the day. The hole needs to be slightly smaller than the diameter of the spile, so it’s important to choose the right drill bit. For commercially made spiles, you’ll need a 7/16” bit.
After drilling the hole, gently tap in the spile with a rubber hammer or mallet, taking care not to damage the spile or split the bark. Once the spile is in place, immediately hang your bucket from it. As mentioned earlier, you can use just about anything in place of buckets to collect the sap. Just be sure your sap collectors will hang securely and accommodate a lid to keep out bugs and debris.
With your bucket in place, simply wait for the sap to start flowing. It may start immediately or you may have to wait a day or so. Be patient. It will run! When the sap begins to flow, empty your buckets into a large, clean, covered container placed in a cool spot outside. Pour the sap into the container through a cheesecloth filter to remove any debris your lids didn’t keep out. Don’t worry if the sap freezes before you begin boiling, freezing has no effect on the syrup quality.
Remove your spiles when you have enough sap, when it stops flowing, or when it begins turning yellow. Yellow sap indicates the tree is about to bud. After you remove the spiles, the tree will heal naturally. TIPS: If you are tapping a previously tapped tree, don’t drill in the same spot. Drill a new hole several inches to the side and about 10 inches above or below. If possible, place your spile directly above a large root or below a large branch. This is where a large quantity of sap will be flowing.
Opinion varies about the number of taps that can be placed in a tree at the same time without damaging it. Some say no more than two, regardless of tree size, while others say as many as five can be placed in a very large tree. It’s probably better to err on the side of caution.
While there are countless ways to build an outdoor evaporator, all share the same governing principle: reducing sap to syrup as quickly as possible.
STEP 5. BOILING DOWN
Start boiling your sap as soon as you have enough to make a decent-sized batch of syrup. Sap can spoil so keep it as cool as possible beforehand, and try not to let it sit longer than a few days before boiling. Spoiled sap has an opaque, milky appearance.
Begin by building a good, hot fire in your firebox. Then pour in your sap to about halfway up the sides. The sap should come to a boil fairly quickly, but the entire boiling down process can take up to eight hours. As the sap boils down, keep adding more.
Boiling down sap develops a surface froth that contains niter, the mineral content of the sap. For most of the boil-down, your only jobs are to skim this froth with a sieve, stoke the fire as necessary and occasionally check the sap’s temperature using a candy thermometer. You’ll notice that it will take quite a few hours for the temperature to rise above the boiling point of water (100°C).
As the sap continues to boil, it gradually thickens and darkens in colour. You’ll know the sap is close to being syrup when bubbles begin to get smaller and its temperature begins rising more rapidly.
When the temperature is just below 219°F or 104°C, test the sap’s consistency by lifting a spoonful straight up and slowly tipping the spoon. If the drops hold together and slip off in small sheets (known as aprons), you’ve got syrup! At this stage, there’s a danger the syrup will scorch or boil over, so be ready to quickly pour it into a temporary container.
TIPS: To avoid reducing the temperature of already boiling sap too much, warm any additional sap before adding it to the pan.
To quickly halt an impending boil-over, touch the rising bubbles with some butter on a stick.
STEP 6. FILTERING AND PRESERVING
For this step, have several heated Mason jars at the ready. Begin by pouring your still hot syrup through a coffee filter or cheese cloth into a clean pot to remove any niter residue. Next, reheat the syrup to the near boiling point, pour into jars and seal tightly.
TIP: Crystal formation at the bottom of a stored jar indicates the syrup was over-boiled.
Story by:
David Bojarzin